 |
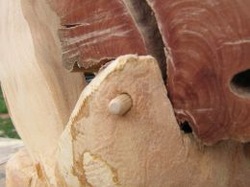
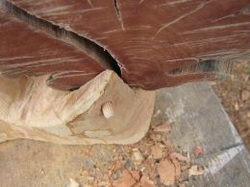
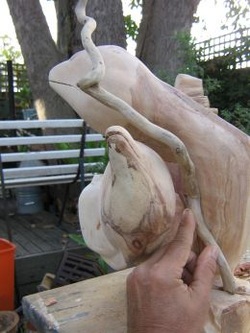
Day 4 & 5My progress was now becoming more visible and I was greatly heartened by the fact that I had found the elusive "thing" that was missing from my sculpture, "Dancing Morays". I debarked the bottom of the piece to begin the process of smoothing the finish with a wood rasp. I intend to leave the base with that rough textured finish rather than a sanded surface. I believe it to mimic the "hairy" appearance of living rock on the ocean floor. I have begun to sand the main bodies of focus and the Tea Tree slab at the rear. I created a rectangular cutout/cradle in the base to house the 'coral'(Tea Tree). I then drilled an 8mm hole through the cradle I made for the coral, proceeding into the coral from there. I aim to anchor the coral with a length of fluted dowel glued into both timbers, with extra glue around the base and sides of the cradle.
|
 |
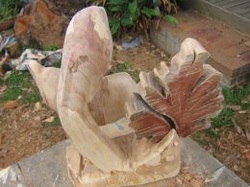
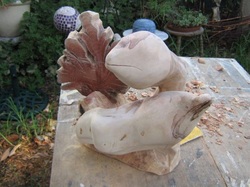
Sanding, and more sandingAs you can plainly see by the photos, I have much more sanding to do yet. I want the main subjects, eels and coral to have mirror smooth finishes which I will then enhance with natural oils like Danish or Scandinavian Teak. The base will be done firstly with an overall wash of either watercolour paint, or stain, in various hues of green. I will possibly use a boot polish black to darken the areas from where the eels emerge from the base structure to give the appearance of holes in the reef's substrate.
|
 |
Final shapingIn the final shaping stages of my sculpture I have filled the gaping hole in the lower eel's bottom jaw that was a natural flaw in the timber which actually had vicious bull ants emerging from its depths. Such are the vagaries of timber. Wouldn't have it any other way. As I say, I filled the hole and filled out the bottom jaw with a pine coloured putty as that was the natural colour showing in the timber. In the crack developing on the upper Moray's body, I will place a mixture of natural sawdust from the piece and wood glue. That should blend in nicely with the rest of the body. If it happens to stand out then so be it. The piece of Birch has such wonderful textures and colours coming through naturally, that one more little section standing out will only add to the overall effect rather than detract from it. I will only begin to carve the eyes once the sanding is near completion, as I do not want to sand out the shallow carvings intended.
|
 |
IntentionsI am telling you what I intend to do in finishing this piece, but this may not necessarily eventuate as I am open to the infinite possibilities of timber. Heck, It takes only one wrong move and I can destroy this piece at any time. I may break something off, sand too much in one area, colour a wrong area, anything can occur while working on a piece. I intend to take it with me while house sitting during the coming Easter break. The transportation may well spell the death of my creation even though I will ensure all possible precautions.
For the piece of driftwood that I will attach to the sculpture with small dowels and wood glue, I wish to give it the appearance of a single strand of black coral. To do this, I am going to coat it with a single layer of Japanning black and covering coat of gloss urethane to give it a 'wet' look. I am still absolutely stoked that I found that piece of driftwood which blends in so precisely with shape I have created. Unfortunately, it will also be the most fragile element within the sculpture. One false move will see it crack or break off at exactly the wrong place. It will make the entire sculpture a delicate affair, but an erstwhile addition none-the-less. I couldn't imagine the piece without it now. |
 |
I will present the completed piece in the last part. I hope I have helped in some small way to present the various stages and mindsets associated with them in a pleasing manner. I have attempted to include more detail in this demo than any other and I hope it succeeds. In truth...the only thing that truly succeeds (sucks seeds), is a beak-less Budgie.
|
